The Art of Parallel Parking
Parallel parking is a driving skill that often evokes a mix of dread and determination in many drivers. For those navigating busy urban environments, the ability to smoothly slip a vehicle into a curbside spot is more than a convenience – it is a necessity. Whether you are a new driver preparing for your road test or an experienced driver looking to enhance your abilities, conquering this maneuver is entirely achievable with a reliable, step-by-step method.
While it may seem complex, parallel parking is fundamentally a practiced sequence of slow, controlled movements. By breaking the process down into manageable stages, you can transform this intimidating task into one you can execute with assurance and finesse. This guide will walk you through the essential steps, ensuring you develop the necessary spatial awareness and technique to park confidently between two cars.
Step 1 – Evaluating the Space and Setting Up

Proper positioning is the foundation of a successful parallel park, setting you up to complete the maneuver easily. Before you signal, you must first confirm that the spot you are eyeing is large enough for your vehicle. Whether you are driving a compact car, a passenger van, or a commercial truck, a good rule of thumb is to look for a space that is approximately 1.5 times the length of your car. Trying to squeeze into a spot that is too short is a common mistake and is best avoided entirely.
Once you have identified an adequate spot, signal your intention to park immediately. Approach the empty space slowly, pulling alongside the vehicle parked in front of the space, leaving roughly 1 metre of space between you and the parked vehicle. Keep moving until your rear bumper is lined up with the parked vehicle’s bumper.
2. The Initial Turn and Reverse
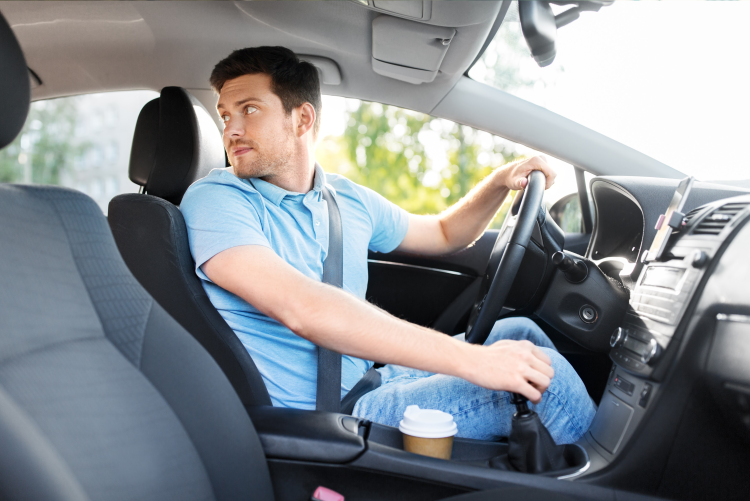
With your setup complete, shift your vehicle into reverse and before moving, do a careful, thorough 360° check of your surroundings: check all mirrors and cameras, scan your blind spots, and turn your body to look directly out the rear window and side passenger windows for any approaching vehicles, bicycles, or pedestrians, including smaller vehicles like a motorcycle.
Begin to slowly reverse, maintaining a smooth and controlled speed, watching out the rear window. As you start moving backward, start steering to the right. You should wind up turning the steering wheel 1½ times to the right. As you reverse, keep a watchful eye on your surroundings, including using the rear window and side mirrors to track the car’s position relative to the vehicle behind you and the curb.
Continue reversing with the wheel fully turned until your car is at approximately a 45-degree angle relative to the curb. At this point, you should be able to look at your right side mirror and see the curb almost touching the rear tire; your car should be forming a triangle with the curb and the already parked vehicle.
3. Straightening Out at the 45-Degree Angle
Once you have reached the 45-degree angle, it is time to adjust your steering. This is the moment to straighten your front wheels by returning the steering wheel to the center position.
Slowly reverse with the wheels straightened. Continue reversing with the wheels straight, while checking your surroundings as you proceed, until the curb disappears in the right side mirror. When you reach this point, you should be positioned such that the rear of your car is squarely in the spot and you are ready for the final turn toward the curb.
4. Completing the Maneuver and Final Adjustment
Once the curb has disappeared from the right side mirror, you are ready to complete the swing. Turn the steering wheel 1½ times to the left until the front of the car swings inward toward the curb.
Proceed until your car is parallel to the curb. Once the vehicle is comfortably nestled in the space and positioned straight, you can stop, shift into drive, and make small final adjustments. You should now straighten your wheels and move the car forward or backward to center it neatly within the spot.
The goal is to ensure you are not too close to the curb, nor are you encroaching on the neighboring vehicles’ space. Ideally, your tires should be between 30 and 45 centimeters from the curb. This range ensures you are legally parked while keeping your tires safe from the curb itself. Striking the right balance is necessary to maintain a safe and legal position.
Once you have secured a good position where you will stay parked, you should perform a “neutral check” to see if you are on a hill. To perform this, put your car in Neutral while keeping your foot lightly on the brake. Briefly release the foot brake to see if the car rolls, and if it does not roll your position is secure. If it does roll, you’re on an incline and should adjust your tires accordingly.
Overcoming Common Challenges and Practicing the Technique

Mastery of parallel parking comes with focused practice, so do not be discouraged if it takes several attempts to get it right. By understanding the common pitfalls, you can quickly course-correct your technique:
- Misjudging the Space: A common error is attempting to park in a space that is too small. Tip: Always confirm the space is large enough before attempting the maneuver. As you pull up alongside the spot, you should be able to visualize having plenty of clearance both in front of your car and behind it to the neighboring vehicles. Trying to squeeze into a spot that is too short is a common mistake and is best avoided entirely.
- Getting Too Close to the Curb: Hitting the curb or ending up with your tires too far away are frequent issues. Tip: If you find yourself too far from the curb after the final adjustment, simply pull slightly forward, turn the wheel toward the curb, and slowly back up again until you reach the ideal 30 to 45 centimeter distance, then straighten up again. If you are too close, turn the wheel away from the curb and pull forward slightly before adjusting back.
- Rushing the Maneuver: Drivers often attempt to complete the park too quickly, which leads to oversteering and hitting the curb or other vehicles. Tip: Maintain a smooth and controlled speed at all times. Parallel parking is a slow-speed maneuver; rushing eliminates your ability to react to your visual checkpoints.
- Incorrect Steering and Misalignment: Errors often involve oversteering or failing to align the car properly during the setup. Tip: Focus on the precise visual checkpoints outlined in Steps 2 and 3: aligning the rear bumpers during the setup, and identifying the moment your front wheel is even with the rear bumper of the car in front before you start straightening the wheel.
To build confidence, incorporate regular practice sessions into your driving routine. Look for quiet streets, perhaps residential areas near South Surrey, Aldergrove, or Chilliwack. Alternatively, find a parking lot with a row of empty spaces; you can practice by pulling up next to the space furthest from you and backing into the one directly behind it, effectively simulating the position of two parked cars. Focusing on the visual reference points mentioned, the 45-degree angle and the alignment of the rear bumpers, will solidify the technique in your muscle memory.
–
In many communities, from the busy shopping districts to tight residential streets, parallel parking remains a necessary skill. The art of parallel parking is a rite of passage for drivers navigating these urban landscapes.
With patience, repeated practice, and by following these clear steps, you can conquer this skill and elevate your driving prowess. Remember to be smooth, keep your speed controlled, and trust the process. Your ability to park confidently will boost your overall confidence on the road.
To learn more about parking in the Lower Mainland, check out Parking in Tight Spots Without Stress: Driver Tips and Drivers Guide to Downhill Parking.

Related Articles
How to Safely Handle Sun Glare While Driving
Is harsh sun glare ruining your drive? Discover the proactive vehicle adjustments and defensive driving techniques that keep BC drivers safe when the horizon vanishes.

Safe Driving Tips for Seniors
Ready to keep your independence on the road? Discover the defensive driving habits that keep BC seniors safe behind the wheel. Read on to stay informed!
Interchange Design in the Fraser Valley
We explore the various interchange design types that define our landscape like the traditional Cloverleaf, modern Diverging Diamond, and how they impact road safety across BC.
