7 Best Areas to Practice Driving
Studying theory and understanding the rules of the road are very important, but having practical driving skills and abilities are going to play a large part in your on-road experience and success. Whether you are heading out for your first drive after getting a licence, gearing up for a road test attempt, or somewhere in between, where and what you practice on the road is important to know before you get behind the wheel!
Let’s talk about the best areas and conditions to practice driving to make sure you have a well-rounded record of practiced experiences.
1. Intersections
Understanding how to navigate through intersections, including going straight, turning left, and turning right is an important skill to master. Start with smaller controlled intersections and as you become more comfortable, work your way towards larger ones. Your residential neighborhood is a great place to start, with intersections that are controlled by stop signs. Sign-controlled intersections allow you to practice the right-of-way rules, including the rules for other vehicles as well as pedestrians.
 Once you are confident using less busy intersections, you can make your way towards something where a bit more skill is needed. Find some busier sign-controlled intersections where you can really put your right-of-way knowledge to work. After increasing your proficiency with sign-controlled intersections, move onto traffic-light controlled intersections. Start with right turns, and once you’re comfortable, move onto left-turns with an advance arrow. After you’ve had a decent amount of practice with these two maneuvers, try your hand at left-turns that have no advance arrow. Not only will you learn how to handle some new maneuvers at a traffic-light controlled intersection, you will also be immersed into heavier vehicle traffic and increased pedestrian traffic.
You can practice intersection negotiation by paying attention when you are a passenger or as a pedestrian. When riding with family or friends try and watch the intersection cycle, as it is easier to understand the intersection cycle as a passenger since you don’t have to focus on controlling the vehicle. This will also help with quick decision making and let you avoid the dreaded horn from behind!
2. Backing
Proper backing technique is an important skill to learn, but can seem intimidating to new drivers who may want to focus on looking forward. You might think that the best place to learn backing skills would be where you are most comfortable – in and out of your driveway – however, this can be one of the most dangerous places to back-up, as it’s easy to miss seeing children, pets, pedestrians, cyclists, and people in wheelchairs.
To practice your backing skills, find a near empty parking lot – like the mall on a weekday evening, church parking lots (not Sunday), your local recreation center during weekdays, a school on the weekend, or a park in the middle of a weekday. This will allow you plenty of space and a lower risk of encountering other road users. The biggest tip for backing up is to make sure you complete a 360° vision check. Look all around your vehicle, shoulder and mirror checking, and then turn your body to look out the rear window while backing up.
Practice backing very slowly trying to utilize your mirrors, glancing at the rearview camera if your vehicle has one, and looking out the back window. Using all the tools in your car will eliminate as many blind spots as possible.
3. Merging
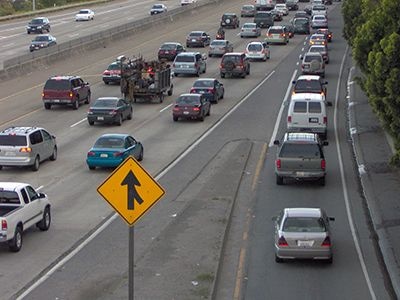
During the course of a drive, whether it’s to work, school, or just a scenic trip, you will be expected to merge into traffic safely without disrupting oncoming flow. While most drivers think of the freeway when they hear the word “merge”, there are plenty of less intimidating places where you can practice merging! Before you head straight for Highway 1 to learn merging skills, try some right turn yields in town to get used to merging with flowing traffic. If you can find one, search out a roadway that has a longer acceleration lane so you have plenty of space and time to practice. The rules and procedures for merging remain the same, no matter the amount of traffic or size of the roadway!
To begin your merging process, scan the moving traffic for a safe gap for you to enter. Use your mirrors to help identify a gap well in advance so you have time to get moving and accelerate to the speed of the moving traffic. As you accelerate and place yourself adjacent to the safe gap you found earlier, put your turn signal on, shoulder check to ensure no one is in your blind spot, and make your move to merge in, after you have merged be sure to cancel your signal and continue at the posted speed limit. Once you have practiced the process on some smaller roadways, challenge yourself with a larger freeway, like Highway 1.
4. Changing Lanes & Pulling Over
Changing lanes and pulling over have a similar process to merging, but you don’t need to worry about starting with a highway or bypass. In fact, before you start working on merging on highways and freeways, try and perfect those same skills while changing lanes on smaller city roads. As you navigate through busy residential neighbourhoods, or a downtown core, practice moving from one lane to another. If you are just starting out, pick a slower time of day or less busy area and as your skills increase, you can venture out with a higher volume of traffic!
To pull over, you’ll want to execute the same skills as you do when changing lanes or merging. It would be best to practice this in quiet neighbourhoods or on side streets, where there will be lots of room to pull over and you will have fewer drivers around you who may be confused why you are pulling over.
After you have executed your pulling over maneuver and you want to rejoin traffic, ensure you check your mirror for a safe gap and then signal your intent to pull out. Before you start moving, shoulder check that no one is in your blind spot – vehicles, cyclists, or pedestrians. Once you have safely entered the roadway, cancel your signal and continue at the posted speed limit.
5. Navigating Hills
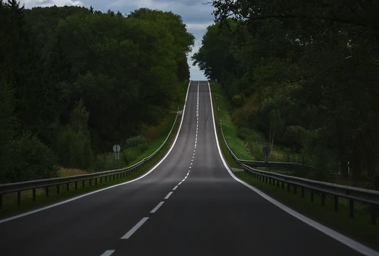 An important part of navigating hills is being aware of your reduced visibility and the dynamics of parking. Reduced visibility will play a part, particularly when going uphill as you are often unable to see past the crest of a hill. Depending on where you are and what kind of surroundings you are driving through, this may mean you need to reduce your speed or be prepared for another road user to suddenly be in your field of vision.
Parking on a hill can create confusion with new and seasoned drivers alike, but the key to hill parking is to figure out which way your wheels should be turned so your vehicle does not roll into traffic. If your vehicle malfunctions or is hit while parked, it will cause less severe damage if it rolls off the road rather than into the road. It’s also important to know the difference between a 90° curb and a mountable curb, as this will determine which way your wheels are turned when facing uphill.
- Turn your wheels to the left when uphill with a 90° curb.
- Turn your wheels to the right when uphill without a curb, or with a mountable curb.
- Turn your wheels to the right when downhill (with or without a curb).
This way, if your vehicle starts to roll it should either hit the curb, or roll onto a lawn or sidewalk, rather than into the road. Do your best to avoid rolling altogether though – ensure your vehicle is in park and engage the hand brake if you’re driving an automatic transmission, and if you’re driving a standard transmission, you should put your vehicle into first gear when parked uphill or on level ground and reverse gear when parked downhill, engaging the hand brake in both instances. When you’re ready to tackle a hill park, find a hill that has a subtle incline for your first attempt. As you practice and feel more comfortable with how to turn your wheels and complete the park, move onto steeper inclines until you’re a pro!
6. Parking
Parking covers a whole range of different maneuvers: parallel parking, pull-through parking, reverse stall parking, and reverse parallel parking. While each parking maneuver differs and offers different pros and cons, the base for learning how to complete them remains the same. For many drivers, parking can be overwhelming, so it’s important to practice parking closer to the beginning of your drive when you and your qualified supervisor have more patience. You’ll also be more focused at the beginning of your drive, and you will need to be!
There are many steps that go into each different style of parking, and it requires you to constantly be watching your surroundings. With this in mind, parking is usually best done in a large parking lot where there are not very many road users for you to share the space with. At least in the beginning! Find a school, mall or department store, or park nearby that won’t be very busy when you’re going out. Malls and department stores, and parks, are often less busy in the middle of the day, whereas a school parking lot might be a good place to head to in the late afternoon or evening, or on the weekend.
In an empty, or near-empty, parking lot you can practice any parking maneuver, you just need to treat the stall lines as whatever scenario you want to practice. A stall line can easily become a curb if you want to practice parallel parking! Whenever you are practicing parking: use your signal, complete a 360° check, and if reversing, look out your rear window.
7. ICBC Road Test Route
It’s important to know that your eventual road test is intended to take you through various driving maneuvers, and that ICBC’s road test routes are constantly changing and evolving. You may want to know “the route” ahead of time so you can drive through and know what to expect, but memorizing a specific route won’t teach you how to drive. Use all of these areas and maneuvers to practice and increase your skill level, and you will be able to drive any route that ICBC has!
Get comfortable driving by practicing in familiar settings, like your neighbourhood, and the drive to and from work or school. Once you gain enough confidence, move to more populated roads and routes that you haven’t been on before. Starting small and increasing the difficulty one step at a time is key, and working at your own pace is perfectly acceptable!
—
Throughout your journey of learning to drive, you will wind up in all kinds of places like local neighbourhoods, small towns, busy freeways, but the skills and knowledge that you build will remain the same no matter where you are. By building up your confidence and skill-level, you will be able to drive anywhere with ease!
Related Articles
How to Dispute a Driving Infraction Ticket in BC
Receiving a traffic ticket can be frustrating, especially if you believe it was issued in error. The process of disputing a ticket in British Columbia may seem daunting, but it is certainly doable. While this information is intended to be a helpful starting point, it is not a substitute for legal advice, so be sure to reach out to a professional if needed. Laws can change, and your specific situation may require professional counsel.
5 Tips for Rookie Truck Drivers
Starting a career as a commercial truck driver is a big step, and the early days on the road can be both challenging and exciting. We’ve got five great tips to help new truck drivers navigate the early stages of their careers with confidence, from landing that first job to staying safe and efficient on the road for years to come.

Motorcycle Lingo Decoded: Understanding Biker Talk
Decode common motorcycle lingo from everyday biker talk and essential gear terms to the hand signals you'll see on the road, the language of bike customization, and how riders communicate in a group.
